Thursday, December 29, 2016

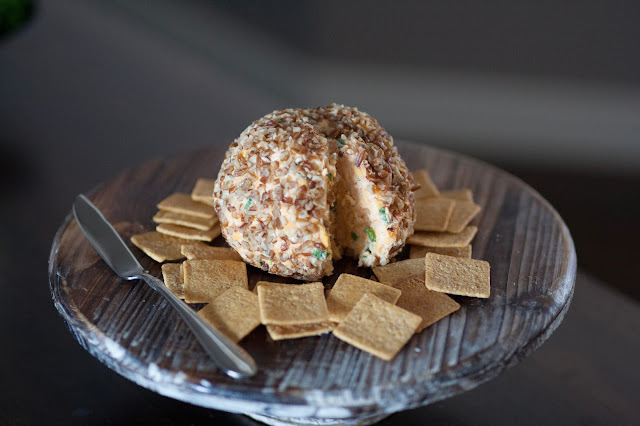
Cheeseball Recipe for a Party!


Cheeseball easy appetizer recipe for a party crowd

Are you looking for easy appetizer recipes for a party? I have the perfect one for you! I haven't made a Cheeseball in YEARS.  I found my moms old recipe since my husband loves snacking on cheese and crackers and spreads.  We decided for New Years Eve we would do a bunch of finger foods and cold appetizers instead of a dinner. You will love how easy this cheeseball recipe is!

The recipe makes 2 cheese balls.  I made the recipe, scooped out half and made the first cheese ball, then added a few ingredients to what was left and now you have two different ones and its SO simple.

INGREDIENTS:
8 oz cream cheese softened
8 oz sharp cheese grated
8 oz mild chedder grated
1/2 cup of mayo or miracle whip
Chopped pecans for garnish

Optional: Green Onion and 2 ounces fresh or 1/2 can of tiny shrimp or crab

Mix the first 4 ingredients in a mixer until completely blended.  I added 1/2 a Tablespoon of Worcestershire sauce and some garlic salt at this point until it tastes the way you like it. Scoop out half and form a ball (I use wax paper and plot it in the middle to form my ball as I hate getting my hands goopy.)  You can put in the fridge to firm up if its too soft and then it will mold easier.  Roll in nuts.

The second half I add 2 ounces fresh or 1/2 can of tiny shrimp or crab and a thinly sliced green onion. Form into a ball and roll in nuts.  You're done!  Easy right?

This recipe is great to make ahead so you can get ready for the party!


 photo signature_zps8ea2292c.png

Thursday, December 22, 2016

The Christmas Cookie You've Never Tried but Should! Napoleons.


Napoleon-dessert-bars

This easy bar dessert recipe with chocolate and vanilla cream is so delicious it will make your heart race! I make sure and make a special batch for my mother-in-law as this is HER favorite of the treats I make. It's mine too! A wonderful dessert for the holidays!

Ingredients:

Crust:
1/2 cup of butter
1/4 cup of sugar
1/4 of cocoa
1 teaspoon of vanilla
Melt in a double boiler until butter is melted. Add 1 egg and stir continuously until thickened, about 3 minutes.
Add:
2 cups of graham cracker crumbs
1 cup of coconut flakes
Press into a 9x9 pan

Filling:
Cream 1/2 cup of butter
1 small package of vanilla pudding
2 cups of powdered sugar
3 Tablespoons of milk
Whip until fluffy.
Spread onto the crust and chill

Chocolate topping:
6 oz of semi-sweet chocolate ships
2 Tablespoons of margarine
Melt in a double boiler and spread on the filling, chill in the fridge.  Cut into squares and keep in the fridge.

So rich and delicious! Its a new holiday cookie that you haven't tried yet for those cookie swaps!

 photo signature_zps8ea2292c.png

Sunday, December 18, 2016

Best Cut-Out Cookies Recipe EVER!


Best-easy-cutout-cookie-recipe

The BEST Cut-Out cookie recipe you will ever taste! Finished my baking this weekend! Lots of cookies for plates and kids, its my favorite thing to do!  I have the perfect Christmas cookie recipe and royal icing that is fast and easy.

Sugar Cookie Ingredients
  • 1 c. {two sticks} of REAL unsalted BUTTER, softened
  • 1 1/2 c. confectioner’s sugar
  • 1 egg
  • 2-3 tsp flavoring {pick what you like, I prefer almond}
  • 2 1/2-2 3/4 c. all-purpose flour
  • 2 tsp. baking powder
  • 1 tsp. salt
Instructions
  1. Cream together softened butter and confectioner’s sugar. Crack the egg into a separate bowl, and add the flavoring. I use emulsions, but extract also works well. Add that to the butter sugar mixture and mix until the egg is thoroughly incorporated. In a separate bowl, sift together the flour, baking powder, and salt, then add little by little to the mixture. I can tell the dough is ready when most of it sticks to the paddle. When I touch it, it has a little give, but does not stick to my fingers.
  2. Roll out on parchment to about 1/4 an inch thick, use flour for dusting as necessary. Then, cut and bake at 400 degrees for 7-8 minutes. This version makes 2-2 1/2 dozen, doubled, it makes 4-5 dozen.

Royal Icing Ingredients
  • 2 pounds {one bag} confectioner's sugar {907 grams}
  • 5 tablespoons meringue powder {approximately 53 grams}
  • 2-3 teaspoons oil-free extract or emulsion
  • 1/2-3/4 cups warm water
Instructions
  1. Begin by stirring the flavoring into half the water.
  2. Using a paddle attachment, gently mix the sugar and meringue powder. It's not necessary to sift the sugar beforehand, but you can if you like.
  3. With the mixer on it's lowest setting slowly add the water/flavoring mix to the dry ingredients. As the water is added, the icing will become thick and lumpy.
  4. Continue to add the remaining water {this may or may not be the entire amount} until the mixture reaches a thick, honey like consistency. At this point, turn the mixer to medium speed and whip 2-4 minutes until this icing is thick and fluffy. Mixing time can vary greatly so watch carefully and stop mixing when the icing is this enough to form a soft peak.

If you're new to royal icing make sure to visit Sweet Sugar Belle's site with lots of tips and tutorials!

Hope you enjoy this easy cut-out cookie recipe!


 photo signature_zps8ea2292c.png

Thursday, December 15, 2016

MOUTH Watering Peanut Butter Crisp Balls!


My husband has FINALLY convinced me to release my family recipe for these amazing Peanut Butter Balls.  I will always remember the first time I took them to my husband's family Christmas... the men actually got into a physical tug-o-war over the balls.  Seriously... It was almost my LAST Christmas with that family! Hahaha.

Ingredients

  • 2 cups creamy peanut butter
  • 1/2 cup butter
  • 3 cups confectioners' sugar
  • 4 cups rice crispy cereal
  • 3 cups semisweet chocolate chips

Directions


  1. Mix room temperature butter with the peanut butter until blended.  Add the powdered sugar and blend. Then add the rice crispy cereal and mix well. 

  2. Form into 1 inch balls, place on cookie sheets, chill till firm in refrigerator (over night is okay). *Tip: I spray my hands every so often with Pam cooking spray so it doesn't stick because it will!

  3. Melt chocolate in double boiler.  I add 2 ounces of food grade paraffin wax that has been grated finely to melt faster, this gives the chocolate coating a gorgeous shiny look. Dip them and place on cookie sheet. As you dip them place them back on cookie sheet and chill until set.  I store these in the refrigerator.

There you have it.  My Pride and Joy... Take care of her.


Don't forget the Almond Raspberry Shortbread cookies that are to die for and the SUPER simple Peppermint Bark!


 photo signature_zps8ea2292c.png

Monday, December 12, 2016

DIY Stocking Hanger!


I've been searching everywhere for the PERFECT stocking hangers... I just never found them.  So I created my own!


I got a board at the hardware store and stained it to match my fireplace. Then I attached a curtain rod to the board to hang the stockings on.  I did weight it down JUST to be sure it wasn't coming down when the stockings were loaded.


That beautiful garland I saw in a store for $89.  RIGHT?  Guess where I found it for $39?  Rite Aid Online of all places.  Decorating on a budget for the win!

I LOVE the look and I can change the spinals next year to something different if I want!  Maybe dress it up a bit more glamorous... what do you think?

I also found this red lantern in the closet that we had and added a wreath around it for a festive look. We can always light it too!


What creative things are you coming up with?


 photo signature_zps8ea2292c.png

Saturday, December 10, 2016

Almond Raspberry Shortbread Cookies!


These cookies MELT in your mouth, they are so yummy.  I make these every year for my husband. So very easy and so good.  What I also love is that my daughter can help in the process.  I used to be a perfectionist with everything I did.  But I will tell you those cookies that my daughter did... they are the priceless perfect ones.


Ingredients
  • 1 cup butter, softened
  • 2/3 cup white sugar
  • 1/2 teaspoon almond extract
  • 2 cups all-purpose flour

  • 1/2 cup seedless raspberry jam
  • 1/2 cup confectioners' sugar
  • 3/4 teaspoon almond extract
  • 1 teaspoon milk

Directions


  1. Preheat oven to 350 degrees F (175 degrees C).

  2. In a medium bowl, cream together butter and white sugar until smooth. Mix in 1/2 teaspoon almond extract. Mix in flour until dough comes together. Roll dough into 1 1/2 inch balls, and place on ungreased cookie sheets. Make a small hole in the center of each ball, using your thumb and finger, and fill the hole with preserves.

  3. Bake for 14 to 18 minutes in preheated oven, or until lightly browned. Let cool 1 minute on the cookie sheet.

  4. In a medium bowl, mix together the confectioners' sugar, 3/4 teaspoon almond extract, and milk until smooth. Drizzle lightly over warm cookies.

 photo signature_zps8ea2292c.png

Tuesday, December 6, 2016

Peppermint Bark


Peppermint Bark is SO easy to make.  And it's chocolate... and peppermint... how can you resist?

Get a 9x9 pan and line it with parchment paper.

Melt 12 oz of Ghirardelli dark chocolate and pour in the pan, stick it in the freezer while you do the next step.

Melt 12 oz of Ghirardelli white chocolate (I put in half a teaspoon of peppermint extract at this point but you don't have too).  Pour on top of the dark. Spread carefully as the white will start to melt the dark and swirl.  You can tap the pan on the counter to get it settled.  Then sprinkle a 1/2 cup of crushed candy canes on top!  Chill in the fridge for at least 2 hours.

I keep mine in the fridge for the holidays... and away from my husband's eyes!

YUM!


 photo signature_zps8ea2292c.png

Monday, December 5, 2016

Best Cookies from our Childhood!

When I think of Christmas as a little girl many images come to mind.  My mother always made chocolate crinkle cookies. This cookie defines Christmas for me, it takes me back to those worry free days of counting down to Christmas.  Dad was a firefighter so we celebrated Christmas either on the Eve or Christmas morning depending on which 24 hour shift he was gone. We always left these cookies with milk for Santa and put out a bowl of ice cream for the reindeer because dad convinced us it was there favorite!


On thing I love most about this cookies is the kids can feel like they are participating.  Rolling the balls is something any child can do!


Ingredients
  • 1 cup unsweetened cocoa powder
  • 2 cups white sugar
  • 1/2 cup vegetable oil
  • 4 eggs
  • 2 teaspoons vanilla extract

  • 2 cups all-purpose flour
  • 2 teaspoons baking powder
  • 1/2 teaspoon salt
  • 1/2 cup confectioners' sugar

Directions


  1. In a medium bowl, mix together cocoa, white sugar, and vegetable oil. Beat in eggs one at a time, then stir in the vanilla. Combine the flour, baking powder, and salt; stir into the cocoa mixture. Cover dough, and chill for at least 4 hours.
  2. Preheat oven to 350 degrees F (175 degrees C). Line cookie sheets with parchment paper. Roll dough into one inch balls. I like to use a number 50 size scoop. Coat each ball in confectioners' sugar before placing onto prepared cookie sheets.
  3. Bake in preheated oven for 10 to 12 minutes. Let stand on the cookie sheet for a minute before transferring to wire racks to cool.

 photo signature_zps8ea2292c.png

Friday, December 2, 2016

Red Velvet Whoopie Pies


What's better than glorious chocolate moist cake cookies with a cream cheese filling?  Coloring it RED!  Man, these whoopie pies by Sally's Baking Addiction are to DIE for.  I'm pretty sure they'll be gone before you read this.

This will be a new holiday tradition for us.  It's different then a basic holiday cookie and so easy and delicious.

Red Velvet Whoopie Pies

Sally's Baking Addiction

Ingredients:

  • 2 cups (250g) all-purpose flour (spoon & leveled)
  • 3 Tablespoons (15g) unsweetened natural cocoa powder
  • 1 teaspoon baking soda
  • 1/2 teaspoon salt
  • 1/2 cup (115g) unsalted butter, softened to room temperature
  • 1 cup (200g) packed light brown sugar
  • 1 large egg, room temperature
  • 2/3 cup (160ml) buttermilk, room temperature
  • 2 teaspoons pure vanilla extract
  • gel red food coloring

Cream Cheese Filling

  • 6 ounces (170g) block cream cheese, softened to room temperature
  • 1/4 cup (1/2 stick; 60g) unsalted butter, softened to room temperature
  • 1 and 1/2 cups (180g) confectioners' sugar, sifted (plus more for topping)
  • 1/2 teaspoon pure vanilla extract

Directions:

  1. Preheat the oven to 350°F (177°C). Line two large baking sheets with parchment paper or silicone baking mats (highly recommended for best nonstick cookie baking surface!). Set aside.
  2. Whisk the flour, cocoa powder, baking soda, and salt together.
  3. In a large bowl using a hand-held or stand mixer fitted with a paddle attachment, beat the butter for 1 minute on medium-high speed until completely smooth and creamy. Add the brown sugar and beat on medium high speed until fluffy and combined. Beat in egg on high speed, scraping down the sides and bottom of the bowl as needed. Once egg is full combined, beat in the vanilla and buttermilk. Mixture may look curdled; that's ok.
  4. On low speed, slowly mix the dry ingredients into the wet ingredients until combined. Add enough food coloring to achieve a deep red hue (usually about 1 teaspoon gel). Spoon mounds of batter, about 1 and 1/2 Tablespoons each, onto prepared baking sheets-- about 3 inches apart.
  5. Bake the cookies for 10-12 minutes or until centers appear set. Mine usually take 11 minutes. Allow to cool completely before sandwiching.
  6. In a large bowl using a hand-held or stand mixer fitted with a paddle or whisk attachment, beat the cream cheese for 1 minute on high speed until completely smooth and creamy. Beat in the butter until combined. Add the confectioners' sugar and vanilla and beat on medium-high speed until combined and creamy.
  7. Pair the cookies up based on their size. Spread cream cheese filling onto the flat side of one cookie and sandwich with the other. Repeat with remaining. Sprinkle confectioners' sugar on top of each if desired. Cover leftover whoopie pies and store in the refrigerator for up to 1 week.
Make ahead tip: You can prepare the batter, cover it tightly, and refrigerate for up to 3 days. Let it come to room temperature and bake as directed. You can freeze the baked whoopie pies for up to 3 months. Wrap them individually. Before enjoying, thaw overnight in the refrigerator.

 photo signature_zps8ea2292c.png

Thursday, December 1, 2016

Poinsettia Sparkle Cocktail with a Version Just for Kids!


This beautifully festive drink is so easy Santa could make it!

Pour Apple Cranberry juice into a chilled champagne glass and fill with your favorite Champagne or Prosecco. You can also add a splash of Elderberry Liquor or Cointreau for an extra kick.

Add a festive garnish of fresh cranberries speared on Sage or frozen cranberries at the bottom to keep the drink nice and chilled.

FOR THE KIDS

Pour Apple Cranberry Juice into a glass and top off with Sparkling Apple Cider! Make sure to add a fun garnish to their drink as well!

We've been busy testing recipes in the kitchen this week so we'll have alot to show you over the holiday season, stay tuned!


 photo signature_zps8ea2292c.png

Monday, November 28, 2016

GIVEAWAY!! Galvanized Steel Tree Collar


Head on over to my Instagram account and sign up to win this adjustable Galvanized Tree Collar! Winner will be contacted Thursday!


 photo signature_zps8ea2292c.png

Wednesday, November 23, 2016

I'm Dreaming of a White Flocked Christmas!


So I had this Charlie Brown Tree that I bought from Walmart for $15 a few years.  It was a sad looking little tree.  I had heard about this amazing Sno-Flock powder from Seasons Reflection that I just HAD to try.  You guys, go and buy this stuff.  IT IS AWESOME.  You can add as much as you want and its really fun to do.  My husband and I put the kids down for a nap and had a great time doing it as a couple.  I can't wait to try it on other items as well!


It's so easy, you just spray your tree with water and shake on the powder with a final spray to set it. It honestly took maybe 15 minutes for our little 5 foot tree. 

Just LOOK how real it looks.  And when I went to move the tree out of the garage, I didn't have snow falling off, it really sticks perfectly.  So EXCITED to find this product.


 photo signature_zps8ea2292c.png

Monday, November 21, 2016

Joy to the World and a FREE Printable!


I was fortunate to get a tree this year from King of Christmas.  Wow.  They sure don't make artificial trees like they used to.  This beauty actually FEELS like a real tree.  I kept telling my husband that I swear I can feel sap on my hands while I was putting the lights on.  If you have been on the fence or you aren't sure which company to go to, go to King of Christmas.  I absolutely LOVE my new tree.

We have a 9 foot tree and it sets up so easy.  No more color coding branches, it just literally POPS up. and it came with a storage bag for when the season is over.  Customer service was EXCELLENT in helping me choose the best tree for my space too.  These guys really are wonderful.

So I got this tree set up and I needed to decorate it.  With all of the unrest in the country I decided to do a JOY TO THE WORLD tree.  I'm really very happy with it!  I got the galvanized tree collar from Home Depot and I made the sign as well as many of the ornaments on the tree.


Here are some fun ideas for decorating:
  • Use two different sizes of lights when decorating.
  • Put 3 small balls on one hanger for a cluster of ornaments, it looks so much better then just all individual balls.
  • For the sign I just got some letters and spray painted white.  I sprinkled it with glitter while it was still wet and added a clear coat.  Took just a few hours!
I'm offering this free printable over on my Instagram page if you would like it!  Happy Thanksgiving!


 photo signature_zps8ea2292c.png

Monday, November 14, 2016

In the Midst of Joy


So the last few days were really tough. My husband and I were going to have a night away. The first night just the two of us since we were married. We were going to celebrate our anniversary and my birthday. We had tickets to a concert and I couldn't wait to feel free, truly free. And then be able to put my head on a pillow and sleep in that freedom. (You moms know what I'm talking about). 


My husband had a disc in his neck burst over a month ago and he has been in severe pain while we wait for answers and a surgery date. During that time we've had to sleep in separate rooms because I'm afraid the baby crying on the monitor will wake him. And when he lives hour to hour in that pain, it's not something you want to happen. So to say I was excited to go away for one night is an understatement. At the last minute our plans were canceled because of the sitter. Oh how my heart broke. We needed this, I needed this so badly. I cried out to God, "why can I have no joy"! 


I decided to get out of the house and went to a store to look at Christmas decor. And that's when God gave me a gift. I had been looking for two mugs by this artist... Why they would be in THIS store is unheard of. But there they were. I saw the name of the artist and gasped, turned it over and saw JOY printed on it... And I knew, and I thanked him for this gift that brought me Joy. Because my Father is always there, always listens and always loves


 photo signature_zps8ea2292c.png

Monday, October 31, 2016

What Every Mom Needs Tonight!

You know how being a mom is a 24 hour job?  From taking care of everyone,  doing the grocery shopping,  scheduling doctors appointments,  cooking dinner,  not to mention bathing and putting the littles to bed. Maybe you go to work or like me you work from home. Your days can start to feel completely out of control.  I mean what the heck did we do with all of our time before we had kids!? I know as a stay at home mom (its hard to admit) but some days I don't even look in the mirror before noon. 

I realized the other day that I hadn't taken a bath in over a year. I mean, I really hadn't even taken a shower without another person babbling away next to me in years.  I can only think of a few times. So when my birthday came around this weekend I told my husband to keep the kids occupied for a bit so I could just relax.  I know,  what's THAT? We mom's put everyone before ourselves.  It's who we are.  But I am FINALLY realizing that it's so important to take time for ourselves.  To refresh our mental and emotional health.  This was my first attempt!  I must say,  I MISSED this.  Of course it only lasted about 15 minutes before my daughter barged in and wanted in!  But it was a start.  And I'm proud of myself.  And you know what?  I'm gonna be proud of you too. 


I had seen these bath teas before and wanted to try them.  There are three kinds.  Tranquil Nights,  Blissful Mind and Soothing Bliss. I used Tranquil Nights and my daughter slept so good so it must work!  They are organic,  botanical and all natural for your littles and made by a mama for mamas.  They come with a little satchel to put the bath tea in if you would like.  I added fresh flowers because like I said....  This was a big deal!!


My wish for you is to take time for yourself.   Just stop.  And breathe. You need this mama!

Source: Botica Bliss Bath Teas  Use code trickortreat for 10% off through November 2nd.


Monday, October 24, 2016

Gourmet Caramel Apples

We had a pumpkin carving party yesterday and since we had so many apples on hand I whipped up some homemade caramel apples.

The kids LOVED them.


Ingredients

  • 1/2 cup butter, cubed
  • 2 cups packed brown sugar
  • 1 cup light corn syrup
  • 1 can (14 ounces) sweetened condensed milk
  • 1 teaspoon vanilla extract
  • 10 to 12 Popsicle sticks
  • 10 to 12 medium tart apples, washed and dried

Directions

  1. In a large heavy saucepan, melt butter; add the brown sugar, corn syrup and salt. Cook and stir over medium heat until mixture comes to a boil, about 10-12 minutes. Stir in milk. Cook and stir until a candy thermometer reads 248° (firm-ball stage). Remove from the heat; stir in vanilla.
  2. Insert Popsicle sticks into apples. Dip each apple into hot caramel mixture; turn to coat. I set them on a silpat sheet but you could use parchment paper as well.  I let the apples cool.
  3. Then I used chocolate wafers and melted them in the microwave or on the stove, whichever you prefer.  I put the melted chocolate in a zip lock baggie, snip the end and drizzle over the apple.  I added Reese Pieces because my husband loves them, but feel free to add any toppings!
  4. Eat them all!


 photo signature_zps8ea2292c.png

Monday, October 10, 2016

Salted Caramel Apple Pie Bars


This is the best recipe you will ever make.  Guaranteed.  I'm asked to make these over and over.  Do not skip the salted caramel recipe, its easy to make and it's what MAKES this amazing. Trust me, you will thank me for sharing this recipe.

Salted Caramel Apple Pie Bars
Sallys Baking Addiction
Printable Recipe

Ingredients:

SHORTBREAD CRUST

  • 1/2 cup (115g) unsalted butter, melted
  • 1/4 cup (50g) granulated sugar
  • 1 teaspoon vanilla extract
  • 1/4 teaspoon salt
  • 1 cup (125g) all-purpose flour (measured correctly)

APPLE FILLING

  • 2 large apples, peeled and thinly sliced (1/4 inch thick)1
  • 2 Tablespoons all-purpose flour
  • 2 Tablespoons granulated sugar
  • 1 teaspoon ground cinnamon
  • 1/8 teaspoon ground nutmeg

STREUSEL

  • 1/2 cup (40g) old-fashioned oats
  • 1/3 cup (70g) packed light or dark brown sugar
  • 1/4 teaspoon ground cinnamon
  • 1/4 cup (30g) all-purpose flour
  • 1/4 cup (60g) unsalted butter, cold and cubed
  • homemade salted caramel sauce (step-by-step photos included)

Directions:

  1. Preheat the oven to 300°F (149°C). Line the bottom and sides of an 8-inch square baking pan with aluminum foil or parchment paper, leaving enough overhang on all sides. Set aside.
  2. Make the crust: Stir the melted butter, granulated sugar, vanilla, and salt together in a medium bowl. Add the flour and stir until everything is combined. Press the mixture evenly into the prepared baking pan. Bake for 15 minutes while you prepare the filling and streusel.
  3. Make the apple filling: Combine the sliced apples, flour, granulated sugar, cinnamon, and nutmeg together in a large bowl until all of the apples are evenly coated. Set aside.
  4. Make the streusel: Whisk the oats, brown sugar, cinnamon, and flour together in a medium bowl. Cut in the chilled butter with a pastry blender or two forks (or even with your hands) until the mixture resembles coarse crumbs. Set aside.
  5. Remove the crust from the oven, and turn the oven up to 350°F (177°C). Evenly layer the apples on top of the warm crust. It will look like there are too many apple slices, so layer them tightly and press them down to fit. Sprinkle the apple layer with streusel and bake for 30–35 minutes or until the streusel is golden brown.
  6. Remove from the oven and allow to cool for at least 20 minutes at room temperature, then chill in the refrigerator for at least 2 hours (or overnight). Lift the foil or parchment out of the pan using the overhang on the sides and cut into bars. I usually cut them into 16 smaller bars, but you can cut them into 12 larger bars. Once cut, drizzle some salted caramel sauce on top of each. These apple pie bars can be enjoyed warm, at room temperature, or even cold.
  7. Make ahead tip: The bars will stay fresh in an airtight container in the refrigerator for 3 days. You can freeze the bars for up to 3 months. Then, thaw overnight in the refrigerator before serving and drizzling with caramel.


 photo signature_zps8ea2292c.png